Tuesday, May 29, 2012

DIY: Hippie Hairband

A girl can never have too many accessories. Therefore we begin with a refreshing hair fashion. The hippie hair band reminds us of easy and relaxing summer afternoons.

Materials needed for the hippie hairband:

Cloth scraps such as denim scraps, at least four equal pieces
Rubber Headband
A Pair of Scissors
Paper
Pencil
Ruler
Thread
Needle

What to do:

To create a heart-shaped template/pattern, use the paper folded twice in the middle. Then draw the arches of the heart on your folded piece of paper. Make sure that the tip of the heart is on the center of the square.


Unfold your paper heart so it would look like a flower. If you want to make necessary changes, just fold it back and cut the heart according to your size preferences.

Now take your scrap of cloth and fold it just like the paper pattern. Make sure that they are as big as your heart-shaped template/pattern. Set the pattern on top of the folded fabric. The tip of the heart must be the center of the folded fabric.


Cut the fabric along the edge. Do this for the rest of the cloth scraps. You would need four heart-shaped cloths. Set aside a small circle, about the size of a coin, from your cloth scrap. You would need this later.


Now place the four heart-shaped cloths on the hairband and stitch them together, making sure that the tips of the heart are facing downwards. Then sew the rounded-shaped cloth in the middle of the hearts to keep them together.

Your Hippie Hairband is done!


I found the original idea here.

More DIY ideas here.

Friday, May 25, 2012

Happy Birthday, Bro (Allan Kalan)

Dear Allan,

Can you imagine?

You still have your long hair.

You still have tinker with your drums; still creating your noisy kind of music.

You still control the drum sticks in your band, Brutal Punishment.

You still head bang your way.

You still manage to enjoy that nighttime kind of life.

You still maintain that same macho figure!

You still keep that happy-go-lucky attitude that keeps you up.

You still prefer to just be...

And yet, you already have a family!

A cute little boy who looks so much like you. A pretty lady on your side.

What else would you wish for on this special day, right?

Happy Birthday!!!

Wednesday, May 23, 2012

Our First Visit to the Animal Shelter

I have been looking for a legitimate excuse to convince my husband to visit the local animal shelter with the whole family.

Then I saw a small announcement in the local paper: a flea market and an open house at the animal shelter last Sunday! I marked the date, hoped for good weather and wished that my husband would be in a consenting mood on that day.

Sunday came. After a short hike to our mountain garden and the family still in the mood for an adventure; I announced my intention to visit the animal shelter. The girls asked why. I told them because there's a flea market and because I wanted to see the dogs.

MC started asking if we could bring home another dog. 'Why should we visit an animal shelter if we are not allowed to bring home a dog?,' she argued. I told her to just enjoy the visit first. Let's wait and see.

IC is a bit sceptic. The best thing is that my husband finally consented! (I have been begging to visit the animal shelter for a long time but my husband is not too enthusiastic about it; don't ask me why!)

We left our dog, Rikki, in the car. She is in heat and we don't want any accidents!

The first thing that we saw are the flea market stands. I thought they would only be selling items for animals but it looked like the normal flea market stands with various household knick-knacks and even a large book stand! But we didn't get the chance to check the items out because we heard the excited barks of dogs.

IC's a bit apprehensive so she was clinging to me; although she was, at the same time, stirring me forcefully to the direction of the barks. We skipped the small animals section (they also have cats, rabbits, etc). MC, meanwhile, is already marching alone, too excited to wait for us.

Nope, we were not allowed to touch them, nor feed them. I cautioned the girls against doing those things.

Then we saw them, the dogs. Big dogs, small dogs. Noisy ones, quiet ones. Shy dogs, friendly dogs. Scary ones, cute ones. I don't know but I suddenly felt emotional; seeing those dogs waiting for the 'right' owner. Some of them staying in the shelter for most of their lives, some of them are returnees, some of them recovering from bad experiences, some of them too cute for their own good, some of them too scared to show-off.

If I could, I would have brought half of them home! But I didn't say anything because...

I already saw MC starting to fall in love with a German Sheperd cuddled in his blanket. She wanted us to bring him home because he looks so sad.

IC was quietly making her way through. I was reading the cards with names, description and history of the dogs for her. She immediately stopped and listened with interest when I told her that the dog in front of her who is quietly oberving us inside the dog house lost an ear because of a bad experience in the past. And IC decided, this is the dog she have been waiting for a long time to have.

To help a little to the shelter's cause and to console my girls who were very much disappointed because they were not allowed to bring home their 'dogs', we bought some of the yummy homemade cakes on sale.

And I repeat, I could have brought home half of the dogs in the shelter. But I cannot. We cannot.
The next day, we decided to bake dozens of dog biscuits that we would donate to the shelter. We promised to help anyway we can.

I think I was not the only one emotionally affected by that very short animal shelter visit. And that was the reason why I wanted to bring the girls with me; I wanted them to be aware about animals in need. I wanted them to know that they could do something to help. Helping me to bake dog biscuits for the animal shelter is the first big step.

Friday, May 18, 2012

DIY: From an Old T-Shirt into Hairbands

This time, the girls requested for new hairbands. Why buy hairbands if we could make them at home?

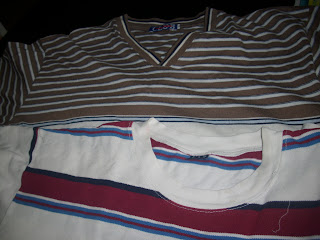
I am used the t-shirt scraps from the cool box cover because of it's elastic quality and the girls love the color.

Materials needed:
an old t-shirt
tape measure
thread
needles
a pair of scissors

To do:

I used the left-over upper neck side, which I cut into stripes.


After measuring each of the girl's head; I started sewing ends together. You need three (3) long stripes because you have to braid them together.


Then I began the process of braiding. I used my knees to keep them fixed.


Though you could also use the sewing machine to keep it in place while you are braiding them. Then, sew both ends to fix the braid.


Then add a piece of garter, around 2 inches, and sew both ends into the braided cloth.


This is how your hair band would look like.

If you want to cover the garter, you need a piece of cloth. Sew the ends of the cloth.

Then wrap it around the area where the garter is.


Fold the cloth and sew both ends to cover the garter.

Here's your hairband now.

Another hairband variety (see left side of the photo) is simply to create a longer braid. Sew the garter in between and let the rest of the braid just hang.

More DIY ideas, here.

Monday, May 14, 2012

First Harvest: Mini Radish


Our backyard is giving rewards again. After weeks of tending the garden: weed pulling, planning and planting, and again weed pulling, and of course, regularly watering; we are being rewarded slowly but surely. And we are having fun, too.

The first harvest? A bunch of mini radish. And with that, we learned a very important lesson. It seemed that my husband planted the seeds very near each other. That's why the radish doesn't have enough room to grow. That is why we now have mini radish.

Oh well, he decided to plant a handful of seeds in another section of the garden. This time, making sure that he's used enough space in between seeds. After all, he is the radish-eater at home. The girls eat them sometimes, not me, though. I can't get used to it's peculiar taste.

My husband doesn't cook radish though. He simply washes them, cuts off the tip and the leaves; and use them as side dish. Sometimes, he adds slices of radish on our green salad, though.

We cannot wait for the next surprise harvests. The girls are looking forward to their special requests of spinach, carrots and tomatoes. And I am looking forward to the first bloom of my seifenkraut (roughly translated: herbal soap weeds). I wanted to start my organic soap project soon!
More to come in the next weeks: spinach, carrots, tomatoes, peas, beans, lettuce, strawberry, etc...

Saturday, May 12, 2012

Happy Mother's Day!

The two reasons why I am allowed to celebrate Mother's Day -- my two girls!

I know that Mother's Day is near because....

I hear their hurried whispers. I hear them stifling giggles. I hear their little feet scrambling, and doors closing, whenever I am near their bedroom doors.

I hear cries for help, but it is only their papa who is allowed to help them. I see small family meetings, but I am not invited.

And the secret is? It's Mother Day :-). Actually, we have established already a Mother's Day ritual, and that includes, me being surprised all the time!

I wish all mothers a very happy Mother's Day!

Wednesday, May 9, 2012

DIY: From an Old T-Shirt into a Cool Box Cover

When it is warm, we always need lots and lots of water on hand during a drive - short or long. That is why we have a cooler (cool box) in the car.

And because our dog, Rikki, is also in the back where the cooler is; I wanted to create something to protect the box.
Thus,  the cool box cover.

Materials needed:
an old t-shirt
tape measure
at least 12 inches of garter
thread
sewing machine (if handsewing, needles)
a pair of scissors

And let's start:

For the old t-shirt, I chose one that is a bit elastic, but not too elastic.

I measured the box, weight and lenght and thickness.

And measured the t-shirt, first I wanted to use the body of the t-shirt, but it was not enough.


I needed a bit more cloth so I cut-off the area near the collar.

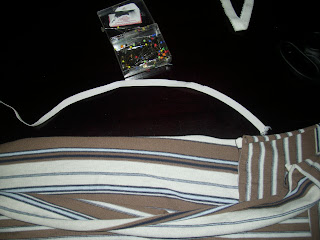
I pinned the extra cloths, getting ready to sew the ends together, to achieve the right size.

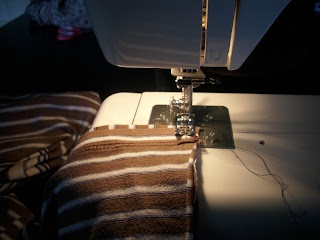
Then I started sewing the edges.

Then I folded (at least two inches) the flaps on the top; placing garters on both sides.

I fixed the garters using pins.

Then I sewed the garters on both sides together, before sewing the top flaps closed.

Here's the cool box cover. But it looks too plain, right? Something is needed.

Using a sleeve of the T-shirt, I cut out enough cloth to create a pocket.


After sewing the pocket on, here's what the cool box cover looks like!

It was fun and easy to create! More DIY ideas, here.

Sunday, May 6, 2012

Lollipop Biscuits

I really wanted to bake a Lollipop Cake. But when I checked all the available recipes in the net, I found them a little complicated for my taste, so I grabbed the simple alternative: I used a sugar cookie recipe.


Ingredients for Lollipop Biscuits:
1 1/2 cups butter, softened
2 cups white sugar
4 eggs
1 pack vanilla extract (25 g)
5 cups all-purpose flour
2 teaspoons baking powder
1 teaspoon salt

Plus:
sticks
chocolate chips
colored sugar chips

Direction:
1. Cream together butter and sugar until smooth. Beat in eggs and vanilla. Stir in the flour, baking powder, and salt. Cover, and chill dough for at least one hour (I froze mine for a few days covered with aluminum folie because I was preparing this for IC's birthday bash).

2. Preheat oven to 200 degrees C. Roll out dough on floured surface around 1/4 inch thick. Cut into different shapes using cookie cutters. Carefully insert the sticks on the cookies' end. Place one inch apart on ungreased cookie sheets.


3. Bake around 6 minutes. The cookie should not be too brown, nor too hard. Cool completely.


Trimmings:
1. Pour a portion of choco chips and choco sugar chips on different plates.
2. Melt the chocolate of your choice.
3. Dip one side of the cookie on the chocolate (you could dip both sides if you want but my kids prefer it not to be too sweet) and immediately dip the same face on choco chips or sugar chips.
4. Leave those dipped Lollipop Cookies on baking sheets to cool completely.
5. Best served on a tall glass ( I used decorated pitchers and recycled bottles).

The kids loved the Lollipop Biscuits, the adults, too.

Friday, May 4, 2012

Stockbrot or Campfire bread

This is one of the best things during campfire! The stockbrot or campfire bread or twisted bread or stick bread. It is called those names are because the 'stockbrot' is twisted, is baked on a campfire and are usually placed on a stick.
the girls grilling their campfire breads (stockbrot)

The girls enjoy looking for the right piece of stick in the woods. My husband would then have to polish the chosen stick so that it would be ready for the 'stockbrot.' Normally, the kids use only one stick, which does not mean that they could only eat one bread. After polishing of one baked bread, they simply twist another dough for the next round, which makes eating it a real adventure.

Ingredients:
1 kg of flour
500 ml hot water
1 teaspoon salt
2 packages of dry yeast (50 grams)
sticks

Preparation

Mix all the ingredients, form into a dough and knead it well.
Place in a cool place between 5-6 hours. Then knead again.

Afterwards, form small a sausage-like shape, then twist it around the end of the stick, starting from the outside. Push the dough ends closer for the best result. Then place it over the campfire to bake. Don't forget to turn your stick regularly to have an evenly baked bread.

It is best baked/cooked over hot coal, so a campfire is the best place to enjoy it.
You need to be patient, though :-)
A 'stockbrot' is delicious combined with a marmalade or butter or cheese.

P.S. Just be careful in letting the kids in front of the campfire. They should know they need to keep distance -- not only for a well-baked bread but also for safety reasons.
Almost done!