Friday, June 29, 2012

Dog Treats: Spinach Biscuits

Spinach Dog Biscuits

We have more than enough spinach in the backyard garden this year. I decided to harvest and use the spinach as much as I can -- therefore, there are always spinach in our menu. Including, our dog's treats: thus Rikki is getting spinach biscuits, mixed with his other treats, these past days.

Spinach is good for dogs. It has high vitamin and iron content. No worries! I am sharing the recipe here:

Grilled Apple with Cheese Cream and Marmalade

Grilled Apple with Cream Cheese and Jam
Apple time! Although this year, it is too wet for the apples. But despite that, we are enjoying the few picks we have in our backyard garden. We are yet to harvest the ripe ones in our mountain garden.

Ingredients for Grilled Apple with Cream Cheese and Jam:
4 pcs. apples
4 tbps. cream cheese
4 tbps. strawberry jam (you can use your favorite jam/marmalade)
4 tsp. brown sugar
some butter
some aluminum folie

Tuesday, June 26, 2012

The Sea of Rocks (Felsenmeer)

The Felsenmeer (Sea of Rocks), located in Lautertal, Odenwald is one favorite adventure grounds of our family. We visit this Eco-Park almost once a year and we never tire of the challenges every visit.

 You see, to really enjoy the Felsenmeer, you need to move your body, to feel your muscles! You need to climb. You need to reach out. You need to move, move, move!

 When the kids were smaller, I would usually give up after 30 minutes. I would retire to the pathways while the husband explores with the kids. This time though, they wanted to climb the Sea of Rocks alone.
The Felsenmeer, view from the first steps up
The bridge in the middle of the Sea of Rocks

Saturday, June 23, 2012

Stir-Fried Noodle with Salami and Peas

Stir-fried Noodles with Salami and Peas; combined with Grilled Cheese Sandwich
This is what usually happens when I'd forget to thaw meat in time: experimenting on recipes and menu combination. But hey, usually, my family would eat them (I guess it is better to eat those experiments than to stay hungry, right?). Fortunately, this time, the recipe worked great.

When I first thought about it, I wasn't sure that the combination would work: salami and noodles; plus grilled cheese! But hey, when one is hungry...

Ingredients for the Stir-Fried Noodles with Salami and Peas

a pack of rice noodles
slices of salami
a cup of peas
salt and pepper to taste
some oil

Preparation:

Heat the oil in a pan. Then add the rice noodles. Combine the salami and the peas, add salt and pepper.

We combined the noodle with grilled cheese sandwich. We simply used a sandwich maker for this.

Other recipes here.

Thursday, June 21, 2012

My Girl Speaks-Up for the Boys

Ten-year-old MC came home from school in a bad mood. 'Mama, all my girl friends in school hate me,' she cried. She explained, 'well, it was during sport. The girls were asked to choose a game. And everybody, including the boys, played that chosen game. When it was time for the boys to select a game they wanted to be played, all the girls resisted.' It turned out that while the girls were alone in the dressing room, MC told them that she finds it unfair for the boys. 'I told the girls in my class that it is not good. The girls must also give in to the boys to be fair.' After saying those words, all the girls turned on MC and said, 'you are supposed to be on our side and not for the boys.' MC argued, 'well, I told you what I feel. I think the boys should have their chance, too.' She left the dressing room afterwards and refused to talk to the girls anymore. After letting her frustration out by talking to us, she felt a little better. 'You know what, Mama, I don't care what the girls think. I will fight for what is right,' she added. Well, my girl, you got that right, too!

Tuesday, June 19, 2012

Our Big Girl Turns One

Rikki (with the green ribbon) with her brother, a few days after birth.
Taken, today, on her first birthday!
Happy birthday, dear Rikki

Monday, June 18, 2012

Hawaiian Dream Cheesecake


This recipe caught my attention because it uses only two tablespoons of flour! And then of course, because the girls simply love pineapple; though alone as a fruit and not as a part of anything baked or cooked. The only food with pineapple they eat is the Spring Salad.

I wanted to know if this Hawaiian Dream Cheesecake would be a hit for them, despite the pineapple being baked.

HAWAIAN DREAM CHEESECAKE

Ingredients
1-3/4 cups coconut flakes
2 tablespoons butter, melted

FILLING:
24 oz cream cheese, softened
1 cup sugar
2 tablespoons all-purpose flour
3 eggs, lightly beaten
1 cup (8 ounces) sour cream
1 teaspoon vanilla extract

PINEAPPLE SAUCE:
1 tablespoon sugar
1 tablespoon cornstarch
2 cans (16 ounces each pineapple cubes), undrained

Preparation:

Combine the coconut flakes and butter. Press onto a greased 9-inches springform pan. Bake at 350° for 10 minutes. Cool.

In another bowl, combine the cream cheese, sugar and flour until smooth. Add eggs; beat on low speed until combined. Stir in sour cream and vanilla until blended. Pour filling onto crust.

Bake at 350° for 45-50 minutes or until center is almost set. Cool in oven with door open for 10 minutes. Carefully run a knife around edge of pan to loosen; cool one hour longer. Refrigerate overnight.

For sauce, combine the sugar and cornstarch in a large saucepan. Stir in the cubed pineapple. Bring to a boil; cook and stir for 2 minutes or until thickened. Cover and refrigerate overnight. Spread pineapple sauce over cheesecake.

Garnish with mint and orchids if desired. Serve with cream.


The original recipe is here.

Despite looking a bit too brown, the cake turned out tasty and creamy. The girls loved it. Boy, am I glad.

Saturday, June 16, 2012

Happy Birthday, Nanay!!

To our very own dear mother, Happy Birthday!

We love you!

Wednesday, June 13, 2012

DIY: From an Old Jeans into a Shoulder Bag

MC doesn't want to wear this pair of jeans anymore. So I decided to make a cut-out shorts for her; still, she refused to wear them.

Therefore, I decided to experiment a little and created this shoulder bag out of MC's old jeans. And she loved it!!
The shoulder bag made from an old pair of jeans.
Materials needed:
an old pair of jeans
thread
a pair of scissors
tape measure
extra accessories depending on your design (like an old belt)
sewing machine

First, cut off the bottom of the jeans into the lenght that you desire.
Mine is bit smaller because my little girl is the one who would use it.
Then undo the seam between the middle area, front and back -- see above

Afterwards, spread the unseamed area and sew them together. 

Then fold and sew least 3 inches above the hemline.

It would look like this.

Turn the jeans inside-out and sew the hemline together. The jeans is already with lining so I didn't have to add one.

Cut pieces on both ends of the edges.

Fold those edges once and sew them. Then turn it again. Then add the bag straps.

The bag is done! The belt is a colorful addition.
Other DIY ideas here.

Tuesday, June 12, 2012

Happy Birthday, Mein Schatz!

On the bridge in the Felsenmeer (Sea of Rocks)

Du bist der Beste!!!

ALLES GUTE ZUM GEBURTSTAG!

Sunday, June 10, 2012

43 in Photos

When I turn 43, I wished for great surprises. I was not disappointed.

My husband and the girls prepared a full breakfast, complete with freshly-bought rolls from the bakery. The table decoration is filled with balloons and my girlie gifts from the girls :-) No photos because I was overwhelmed by all of it so early in the morning.

For my birthday cake, the family baked a New Yorker Cheesecake with Freshly-Picked Red Currants. A first time!
The girls enjoyed cruising with Opa's oldtimer motorbike with Papa driving; and then, I tried driving it, yehawww!
It took time to master the first important step but I did it!
Dinner at the Volkano Restaurant after a short walk in the strawberry fields with our dog. The restaurant's ambiance is a big hit with the girls.
After dinner ice cream treat, Biene Maja for IC.
Back home, I watched the European Football Championship Game between Germany and Portugal with the girls.
They were screaming louder than the neighborhood boys! Plus, the girls begged us to decorate our car with the German flags just like this car in photo. And they wanted to cover our whole house with the German flags, too! (Oh, Germany won 1-0 against Portugal).

Wednesday, June 6, 2012

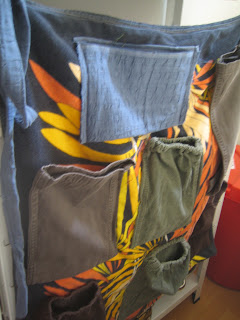
DIY: From an Old Bath Towel into a Hanging Storage


I was browsing into an outdoor magazine, looking for camping items. We are getting ready for our camping trip this summer! Since we are using a big tent; I was looking for articles that could help me in the storage area.

I wanted something that I can hang anywhere, something with enough space, something sturdy, something washable, something affordable. After looking though the available items in the catalogue, I ended up creating my own storage thingy.

I used an old yet still sturdy towel, plus scraps of cloths. (I recently turned a few pair of jeans of the girls into shorts and it's a good thing I didn't throw those scraps away.)


Materials:

an old towel
enough scraps of cloths ( for example, bottoms of jeans)
a pair of scissors
some threads
pins
a sewing machine (or you can handsew, too, then you would need needles)

How to create the hanging storage:


First, I cut and sew together two long strips of cloths, at least two inches thick, again using scraps from those jeans. Folding the towel, I fixed the strips of cloths with pins on both ends of the folded towel, this would be the top side.


Then I sew the whole edge of the towel.


Then I created my storage pockets pattern, using the scraps of jeans. I choose colors that would match with my towel. I decided to keep the bottom part of the jeans as openings.


Again, I fixed them with pins.


Then I started sewing the storage pockets.


Here's how the hanging storage looks like.

And in use :-) I stuffed it with different kitchen items, I am glad it held. We are ready to camp!
More DIY items here.

Saturday, June 2, 2012

Tuna and Apple Sandwich


And because apples are back --- this tuna and apple sandwich is a must at home.

This is a very easy recipe. My girls and I love this so much; we have yet to convince my husband to taste it though as he hates all things coming from the can, especially seafood.

Ingredients:
- a can of tuna, drained
- an apple, cut in very thin slices
- 1-2 tbsp mayonnaise
- a few leaves of lettuce
- some toast
- salt and pepper to taste

Preparation:
Put tuna, apple slices, mayonnaise, salt and pepper in a big bowl. Mix well. Then create your own sandwich.

Tip:
IC loves to add tomato slices in her sandwich.
MC prefers to add slices of boiled eggs.
I go for the plain variety -- no tomatoes, no eggs.
My husband loves to watch us eating this sandwich :-)